Secrets and BTS

Sunday

Pinterest Diy #3

I'm back! And back with another Pinterest Diy attempt. I've seen this pin going around so I decided I was going to attempt it and see if it will work so you don't have to. Since it's the fall season and the Holidays are coming up and stuff, I tried out the Mod Podge Fall Leaf Bowl pin.

Autumn Leaf Bowls: These Fall leaf bowls capture the essence of the season. http://pinterest.com/pin/514114113692221644/?utm_source=android_share


So I live in California.... and here--we don't get fall, never mind fall leaves. Yet for some reason I tried to find some. On I went around the neighborhood on a quest to find a sufficient amount of non-crumbly red, orange, and yellow leaves. Two hours later I sit down at my table with a plastic bag filled with some leaves who's chlorophyll is breaking down.

Following the directions I blow up a balloon and try to balance it on some container and after some mcgivering made it still.

It was now time for the actual project. With a foam brush I painted on the first layer of mod podge onto the balloon and slapped on a bunch of leaves. Repeating this process a thousand more times after a couple hours it seemed like the bowl was thick enough.

I let it dry for a couple more hours to make sure it was solid.
Then using scissors, cut a slit into the balloon to slowly let the air out.
The results were horrendous.
What have I just spent, an entire day on.

It fell apart into a sticky mess of rotting leaves.

But now Iv'e got a bag of a bunch of leaves. You know what?--Let me just glue it onto a piece of paper to make an art piece that will slowly disintegrate. And so I did. And because I was bored I decided to waste my time making it ombre.

 Taking another 45 min I separated a bunch of leaves in order of shade ranging from dark red to light yellow. After I had enough leaves I started gluing them onto some piece of printer paper.

So yah... there wen't time of my life that I won't be getting back anytime soon.


My Life!?

Hey my buddies! Ima just warn you right now... NOT A DIY JUST A PIECE OF MY LIFE. But anyways on with it.
So today I went down to Studio City to visit my great grandfather. My dad and I took him to a breakfast diner and we sat there and talked.
Fun stuff right?
Lets get on to the more interesting events of my day...
I have a science fair project which requires some melted rock. And the only ways to get melted rock is either naturally at a volcano, or you make it in a kiln.

So for anyone who has no clue what a kiln is, it's a very insulated high powered oven. Party! On to more fun stuff! So we picked up my dad's old kiln from North Hollywood and brought it back to our house. "Will we be able to even start it after sitting in the dust for 8 years." While we were still in North Hollywood we started up a high pressure air thingy and blew off all the dust. 
But how were we supposed to test it out?
"How about we melt some pennies!" I was now excited to deface some American currency.

We plugged in the little oven and popped in the ceramic bowl containing 6 zinc pennies.
"2,000 degrees Fahrenheit" is what the thermometer read. 
FAST FORWARD >>>>
I grab a wrench or some random tool and start to pull out my ceramic dish.

*CLICK* The half of the crucible I was pulling out dis-attached from the lower half of the dish. And nearly disintegrated onto the concrete floor. I quickly pulled the lower half out and let that fall and break on the driveway aswell. This made the molten zinc spill onto the floor and splatter everywhere.

My dad poured some beer on the zinc cool it down. I pick it up not noticing how extremely SHARP it was. Into my skin it pierced. So on the end of this exciting day, I sit at my laptop with a bandaid around my thumb typing this very sentence.
I HOPE YOU ENJOYED MY WONDERFUL PEOPLE! STAY WARM!

Friday

Pinterest Diy #2

Hey people! Here is the second Pinterest win or fail post! So today I had to skip school because I messed up my shoulder and my neck-ish. This caused me to be immobile and deep in pain. But to help me get my mind off of it I decided to do a Pinterest Diy that I've wanted to do for a while-- a brownie in a mug! I was very excited because it seemed so easy; I went right to work to find the ingredients. So... I live in a quite health conscious house owned by my registered dietitian mother; let's just say I had to get creative. Instead of using the 1/4 cup of flour it calls for, I had to figure out something close to that because we have no flour. I scavenged the house looking behind cupboards and in drawers. My final stop was the fridge where I spotted gluten free pancake mix. "This should work." I thought to myself.
Usually when you think of sugar, you think of the white dyed ground up processed sugar which most recipes call for, but I have none of that. Instead I found a large jar of raw sugar in the back of the pantry. At this point I've substituted such a major part that a different type of sugar shouldn't make a difference.
But then there was one more thing... I forgot we don't have a microwave. Well what was I going to do! I was so ready to have a tasty easy brownie. At this point I wasn't going to give up. We have other appliances that shoot hot air at food. I decided to go with a mini-inferred oven.
All that was left to do was to mix the ingredients.
Disclaimer: The recipe and directions rightfully belong to Simply Recipes and you can check it out at http://www.simplyrecipes.com/recipes/brownie_in_a_mug/  I am not ownership of How to prepare it or it's recipe.

The Recipe:


  • 1/4 cup flour (50 g)
  • 1/4 cup sugar (70 g)
  • 2 Tbsp (13 g) cocoa (natural, unsweetened)
  • Pinch of salt
  • Tiny pinch of cinnamon
  • 1/4 cup water (60 ml)
  • 2 Tbsp canola oil or vegetable oil (NOT extra virgin olive oil, it's too strongly flavored)
  • 1 to 2 drops vanilla extract
  • 1 small scoop of ice cream or 1 or 2 teaspoons heavy whipping cream to serve


  • Mini oven is that thing on the leftHow to Prepare it:

    1. Place flour, sugar, cocoa, salt, and cinnamon in a microwave safe ceramic mug. Stir with a fork or spoon to mix well and break up any clumps.


    2. Add the oil, water, and vanilla to the cup and stir until the mixture is smooth and there are no lumps.

    3. Place in microwave and heat on high until the mixture is cooked through, about a 1 minute and 40 seconds for a 1000 watt microwave. You may have to experiment and adjust the time for less or more powerful microwaves. If you don't know the power level on your microwave, start with 60 seconds and increase until the brownie is done. It should still be moist when cooked through, not dry.

    Looks pretty good right? Nope.
    4. Let cool for a minute and serve with a scoop of vanilla ice cream or a teaspoon or two of whipping cream poured over.


    How I Prepare it:

    1. Put the dry ingredients like the gluten free pancake mix and sugar and stuff into the cup with their correct measurements.

    2. I added the liquids and stirred the ingredients all together.

    3. I placed it in the mini oven thing and let that run twice for 2 minute intervals. 

    4. I did some magic gymnastics and acrobats and managed to get it out of the mini oven using an apron. 
    5. I tried out my "5" minute brownie.
    6. I spat it out from disgust and asked myself why I ever trusted Pinterest.

    THE END!

    Sunday

    Welp...Sorry :/

    I HAD JUST PROMISED MULTIPLE POSTS AND THEN MY CAMERA BREAKS. I'm so sorry guys :( I had so many fun DIYs planned for Halloween and then BAM camera doesn't turn on. And what would a page of boring words be?- Nothing fun. So I finally got the camera working the day after Halloween so I figured why would I do a post for a holiday after it passes. So this is my apology for being such a failure. I had some problems with my battery and had to fix some prongs and whatnot. So for now thus is all I have as a second post. Enjoy your extra hour Californians!

    Saturday

    What have I made...

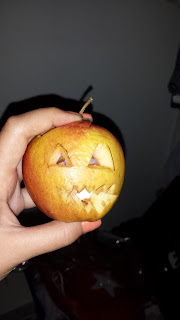
    Hey guys, welcome back to my blog! Because today is Halloween, I decided not only will my posts be Halloween themed... but because today is a special holiday I'm going to be doing three posts! Anyways today I was just lying around my boring anti-Halloween house thinking what can I do to make this place feel more in the spirit? I have not spiders or skeletons, no ghosts or goblins, and no pumpkins. What am I going to do with a pumpkin-less Halloween? Buying a pumpkin is expensive and time consuming. So I fell back onto the couch and started brainstorming. What can I use instead of a pumpkin that I can easily find around the house? A cup?-Cant carve that. A flower?- What use is that. What about a round fruit! I had finally made my decision. I ran into the kitchen swung open a fridge and there it was- my pumpkin substitute- an apple. Apples are kind of like pumpkins, right? So I went to it and documented it.

    The Materials I Found Useful:

    1. An apple
    2. A knife
    3. A bowl for the apple guts
    4. A small flame-less candle

    How I did it:

    Step 1: I got my apple, washed it, and removed the labels stuck to it.

    Step 2: I started with cutting the top off, but the only problem I ran into was an apple and a pumpkin's anatomy are not the same. You can easily take the top off of a pumpkin but when working with an apple you end up cutting through the entire apple to the other side and stabbing yourself. This is why you want to angle your knife down instead of your pumpkin 50 degree angle. 

    Step 3: After your apple top is off, clean out the inside of the apple leaving enough space for the candle to be put inside. 

    Step 4: Draw your face/design onto the apple.

    Step 5: Carve your apple!

    Step 6: Turn on your candle and put it into the apple. After it is in put the top back on.
    Step 7: Turn off the lights and watch your mini "pumpkin" glow.


    Sunday

    Pinterest Diy #1

    Ahh! Hey guys, and welcome back! Before I get to this weeks Diy I'm announcing this new series. Pinterest Diy, Will it Work or Fail! I know its quite the mouthful of a name because honestly, I'm not creative enough to make it shorter. Anyways I will be trying popular Pinterest Diy's to save you guys the time of trying it out yourself! This week I'm going to be trying to make a strapless dress out of an over sized t-shirt! This pin is under: 29 Ways To Makeover A Boxy Men's T-Shirt
    Materials you'll need:
    1. An over sized shirt!
    How to Do it!
    Step 1: Do some crazy folding by following the directions.
    The only directions that came with it is this picture.
    I guess I'll try it out!

    And there you have it! A very easy simple strapless dress made from an over sized shirt! If you were to try this pin, do it with a shirt that has a huge neck hole. Other than that I think it worked pretty well.


    A Tropical Centerpiece

    Hey! Welcome back to my blog! This week I'll be showing you how to finish off your room with just a small centerpiece. The best part about it is; it's so much cheaper to make than buy! To buy one can range from $20-$40! Who wants to spend that much when they could do the same thing for about $2!

    Materials you'll need:


    1. Candle Holder or Small Basket
    2. A Bag of Small Sea Shells

    3.  Water if needed
    4. Hot glue gun if needed
    5. Wax Block if needed
    6. Wick if needed
    7. Paper Towel
    8. Sand of any type if needed

    How to Do it!

    Step 1: First step as always is to gather your materials! If you used your candle holder for a candle there may be wax left in it.


    The best way I found to clean it out was I took the candle holder to the sink and poured hot water in it; after that sat for a minute or two I dumped out the hot water and immediately put cold water in it. You will find it easy to just pop off all of the wax instead of scraping at it with a pair of scissors.   

    Step 2: Now that your candle holder is clean/ your basket, open the shell bag or box and dump out the contents onto a paper towel or then your table will look like this. When I opened the bag shell fragments and dust went all over the table.


     Pick out the shells you would like to use and put the others back in the bag. If you are planning to use sand in your project fill your candle holder with it to about 1/5 full.

    Step 3: Take your shells and place them into the sand or into the holder. This is where you can start your customization. Instead of putting your shells into the candle holder you can hot glue them around the outside of your holder and still use it for candles. Or you can use it as a pencil holder! With this the possibilities are endless! If you melt some wax blocks (preferably blue) and pour that into the candle holder filled with shells, you can turn the holder into a candle!

    Step 4: You can do whatever you would like. The purpose of this DIY is for you to get creative and give this project your own personal touch. So go ahead and do that!

    Saturday

    Penny Power!

    This week I will show you how to make a battery,  out of pennies! Depending on how many pennies you use the more voltage you will get. The magic behind it is the zinc in pennies dating after 1982; and the vinegar soaked into the cardboard. The zinc in the pennies react to the vinegar and release energy. This energy can then be used to power small electronics like a pocket calculator or in my case, a small led. The best part about it is that it will only cost you pennies!

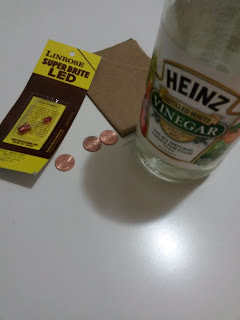
    Materials you'll need:
    1. Pennies dating after 1982

    2. Sandpaper (I used a 60-grit)

    3. A bowl
    4. Vinegar
    5. Cardboard
    6. Scissors
    7. Item you wish to power
    How to Do it!
    Step 1: Gather your materials!
    Step 2: Put the bowl, vinegar, cardboard, and scissors to the side for now.
    Step 3: Use the sandpaper on the "tails" side of the coin, I found this to be the quickest side to sand down. Sand only one side of the penny until it completely exposes the zinc.

    Step 4: Repeat step three to as many pennies as you would like. I sanded only three pennies for this project and still got great results.

    Step 5: Now put the pennies to the side and bring out the items from step two.
    Step 6: Cut out circles that are slightly larger than your pennies. The number of pennies you are using is one more than the amount of cardboard pieces you need. So if I have 3 pennies, I need 2 cardboard pieces.
    Step 7: Put the cardboard circles into the bowl and pour enough vinegar onto it so it's covered.
    Step 8: After 5 minutes the cardboard should have soaked up a good amount of vinegar. Take the pieces out ans tap dry them.
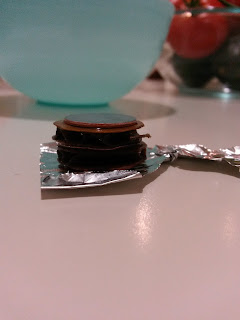
    Step 9: Finally it is time for stacking the pennies. On the bottom is a penny with the zinc side facing up, next is a piece of vinegar cardboard, then a penny zinc face up. Continue this pattern until you have no more pennies and there is a coin at the top.

    Step 10: Test your battery. You can do all sorts of things! To make sure the energy flows correctly a simple led light can be used. This gives you a visual understanding of the power in pennies. When using wires, put tin foil at the very bottom of the stack so it can flow into the wire easily instead of you holding them together for a while. 

    Thursday

    Book Folding!

    Welcome my friends!
    I'm going to teach you how to fold books into art (the easy way)! For this tutorial I'm going to be doing a simple heart design.

    For this project you will need:

    1. A book (preferably hard cover) with a page count of 200-800
    2. A pencil or something to write with
    3. A design you want to do

    How to do it:

    1. Gather your materials for the project!
    2. Find a design you want to do.

    3. Draw your design on the side of your book opposite of the spine. (For this I'm doing 2 straight lines towards the top of the book, you'll see why. )


    4. Fold your pages inwards but not past the line like shown in the picture.
    5. Repeat step 4 until all of the design has been folded.


    EASY Paper Embossing!

    Hey guys this week I'm going to be showing you how to do really easy paper embossing! It makes practically no mess and is cool when sending cards or making a gift! I recently added a poll to see how you guys liked the DIY!
    Materials you'll need:
    1. Paper
    2. Scrap Cardboard
    3. Mechanical Pencil
    4. Scissors, Hobby Knife, or Exacto Knife

    How to Do it!
    Step 1: Gather all your supplies for this project and clear a work space for it
    Step 2: Start by drawing your desired design on the cardboard
    Step 3: Cut out the drawing and put it under the paper
    Step 4: Trace the outside of the cardboard using your mechanical pencil (with no lead)
    Step 5: There you have it! Your embossed design is "engraved" onto the paper!

    Wednesday

    Flowers Made of Toilet Paper Rolls

    This week we are going to be making toilet paper roll flowers. All though it may sound funny at first. It is very easy and simple to do.
    Materials you'll need:
    1. Toilet paper rolls and paper towel rolls
    2. Hot glue gun
    3. Spray paint or paint of your choice (I'm going to do white)
    4. Paint brush (If not using spray paint)
    5. Place to paint
    6. Scissors
    How to Do it!
    Step 1: Gather your toilet paper/ paper towel rolls.
    Step 2: Make sure there isn't any toilet paper or or paper towel left on the roll.
    Step 3: Gather the remaining supplies.
    Step 4: With your scissors, cut the rolls into 3/4 of an inch length. (It doesn't have to be perfect)
    Step 5: Go outside to spray paint
    Step 6: Spray paint it and wait for it to dry
    Step 7: Take the dry spray painted pieces and arrange them in the desired flower pattern
    Step 8: Hot glue pieces together with a dab of glue between each piece
    Step 9: Enjoy your artwork and add any detailing you'd like (rustic look is what I'm going for)


    Thursday

    Intro

    Hello Everyone! Welcome to my fabulous Blog! Here I will post about all sorts of things. These include; random diy's, thoughts, and other stuff. I will post 1-2 times a week. A little about myself is:
    I love computers,  3d printers, gaming,  All of It! Producing content wheter it be writing or making videos I absolutely love, too. Some more about myself is I'm just a casual 8th grade girl going through life and writing about it. So make sure to always leave a comment and follow for new posts! I may do some 3d models per request and other fun things to give to my audience! Love you all <3