Secrets and BTS

Sunday

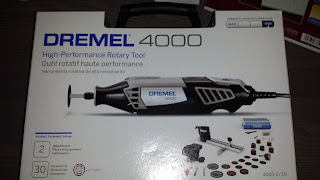
Playing around with my Dremel 4000!

Hey my friends! Welcome back ♥ So for the past couple months I've wanted to get a simple rotary tool. My father had suggested to go with the Dremel brand. Which I decided to do. Earlier today (the 31st of January) we did a trip to Osh and I bought the Dremel 4000 High-Performance Rotary Tool.


Oh was I excited! With 30 accessories, there was no way I could wait to use it. After attaching the piece number EZ406, I decided to just cut a random aluminum can and get a feel for the tool. After that I decided to start on a project I have wanted to do for a while: make a circuit board heart pendant. I grabbed a retired video card

and removed the screws holding the cooling fan in place.


I unplugged the fan from the socket and now had a semi-clean board to work with. With the knowledge sparks may fly or fumes may emerge; I wore all required safety protection.


 Just as a test as to which speed I should use and pressure I must apply I cut out a small rectangle.

After that it was straight to work on cutting out a heart for the purpose of being a pendant. After countless hours of work I finally cut out a kinda heart.


But I was not going to stop there for I had all the tools I needed to make it look great. Quickly I change the bit to a cone shaped sanding piece (#953). With this I get straight to work on smoothing and rounding the edges. Unfortunately the board has large amounts of copper in it and the copper "clogged" up the surface of the sanding piece leaving it useless. But enough work had been done on it for the day. And it looks great! Kinda?

From what I can see it can cut anything. So if you want me to slice something leave me your suggestions in the comments!

Have a great day everyone! Love you all!
-Tessa ♥

Disclaimer: DO NOT TRY THIS AT HOME OR YOU MAY CHOP OFF YOUR FINGERS! Thank you! ☺

Saturday

Pinterest Diy #5

Hey Guys! Welcome back my lovely friends! <3 I know I didn't post Sunday, I was lazy and was watching the Broncos football game. And now a full week after doing the diy, I decided to write the blog! Other than that, I will give the brief back story to this pin. My hands were disgustingly dry and probably had some dead skin. And for that reason I decided to make a Diy Salt Scrub. 


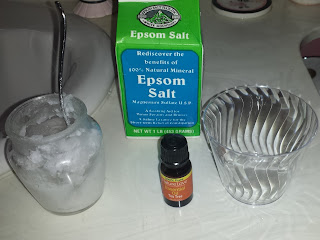
Materials you'll need:

1. Coconut oil and/or regular cooking fat (olive oil) -2/3 Cup
2. Essential oils (100%) - 20 Drops
3. Epsom salt - 1 1/3 Cups
4. Table salt (If needed) - As much as needed
5. A bowl or container you plan to keep it in - 1 Pint

How to Do it!

Step 1:Gather your materials! :P

Step 2: Start by adding your dry ingredients being the salt to the container. If you do not have enough Epsom salt (like me), you may add the remainder with table salt.
Now here is where I made one of a thousand other mistakes. You must melt the coconut oil before adding it. Being the stubborn person I am I decided not to thinking it was already soft enough, and I added it to the mixture. Big mistake don't do that!

Step 3: Pour your melted oil in with the the salt and stir the mixture. (I had to do something different though)

Step 4: Drop 20 drops of your 100% pure essential oil and stir that into the salt and oil.

Step 5: And there you have it! An easy to make and use salt scrub! Keep reading if you want to see how I did it...


Same materials, different procedure and measurements.

When I saw how much it was going to make, I was sure that it was too much for me. What I did instead was just eye out the measurements and hoped for the best. Because of this though, everything was just a great fun mess -- BUT it still worked! So without further ado... lets get on with it!

How to Do it! (My way)
Step 1: Pour all the Epsom salt you have into a small disposable cup.
Step 2: Notice that it is not nearly enough salt, and slowly pour salt from a soy sauce container (because that is how this household works).


Step 3: Get a couple spoon fulls of solid coconut oil and plop it onto the salt. This is where you are supposed to start wondering how in the world this is supposed to work, and then realize that you did it wrong. Using your handy-dandy brain, one must fill up a sink with hot water and place the cup into it and hope it would melt.
Step 4: Give yourself a pat on the back and still drop 20 drops of essential oils into your mixture because that handy-dandy brain wasn't thinking at that moment. Stir the mixture and you are good to go!
Step 5: Realize that you are not good to go because it is too runny. Keep adding more and more salt until it is too dry. Now add some more olive oil. This time slowly add to and test the scrub.

Step 6: Congratulate yourself on achieving nice smooth hands after using it 20 times while testing!
Step 7: Force everybody in your family to use the scrub because you worked so long on it!

Stay warm, safe, and have a great day! <3


Love you all

-Tessa


Sunday

Pinterest Diy #4

Hello my wonderful humans (or animals, I don't judge)! Welcome back to our 4th post of the Pinterest Diy series!
Now I don't know about you, but my pet rocks look quite boring and I believe they deserve to look pretty. For that reason I decided to try the Sharpie Zenstones pin:
Buzzfeed 34 Things you can Make with a Sharpie
Original post from:
Art Judy

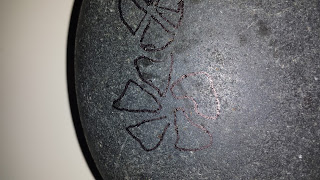
So I looked around my backyard and to my luck we had piles of decorative beach stones. I grabbed a couple, rinsed them off, then used a palm sander to sand off any imperfections. After that I got straight to work.


Materials you'll need:
1. Beach Stones


2. Palm Sander (Optional)

3. Sharpie 


How to Do it!
Step 1: Start off with... Gathering your materials!
Step 2: With your clean and smooth beach stones in hand, grab your sharpie and start drawing. You can make up your own design or get "inspiration" from the Internet!

Step 3: When done with design, you can either leave it; or for high durability, spray on a sealant. I've only seen a clear-coat varnish be used, but I bet something like a clear drying mod podge would work just as well. 

Now I think I did pretty good, but that's for you guy's to judge... (Pictures left is professionally done. right is my attempt)


Step 4: Do something with it! Put it in your backyard zen garden, in flower pots, anywhere!


Love you all,

Tessa <3


Secret Magical Wonderfulness!!!

So I tried it with colored sharpies....
...
...
...
...
...
...
...
...
...
...
...
...
...
...
...
...
...
...
...
...
...
...
...
and it worked!

I'm back!

GUESS WHO'S BACK?!
That's right.... I am. And I am here to stay, for a while. Anyways long story-short I took a break from my blog. But that doesn't matter because this week I am continuing the wonderful Pinterest Diy attempt things series!

Love you all,
Tessa