Secrets and BTS

Saturday

What have I made...

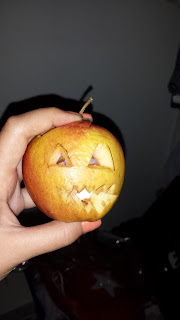
Hey guys, welcome back to my blog! Because today is Halloween, I decided not only will my posts be Halloween themed... but because today is a special holiday I'm going to be doing three posts! Anyways today I was just lying around my boring anti-Halloween house thinking what can I do to make this place feel more in the spirit? I have not spiders or skeletons, no ghosts or goblins, and no pumpkins. What am I going to do with a pumpkin-less Halloween? Buying a pumpkin is expensive and time consuming. So I fell back onto the couch and started brainstorming. What can I use instead of a pumpkin that I can easily find around the house? A cup?-Cant carve that. A flower?- What use is that. What about a round fruit! I had finally made my decision. I ran into the kitchen swung open a fridge and there it was- my pumpkin substitute- an apple. Apples are kind of like pumpkins, right? So I went to it and documented it.

The Materials I Found Useful:

1. An apple
2. A knife
3. A bowl for the apple guts
4. A small flame-less candle

How I did it:

Step 1: I got my apple, washed it, and removed the labels stuck to it.

Step 2: I started with cutting the top off, but the only problem I ran into was an apple and a pumpkin's anatomy are not the same. You can easily take the top off of a pumpkin but when working with an apple you end up cutting through the entire apple to the other side and stabbing yourself. This is why you want to angle your knife down instead of your pumpkin 50 degree angle. 

Step 3: After your apple top is off, clean out the inside of the apple leaving enough space for the candle to be put inside. 

Step 4: Draw your face/design onto the apple.

Step 5: Carve your apple!

Step 6: Turn on your candle and put it into the apple. After it is in put the top back on.
Step 7: Turn off the lights and watch your mini "pumpkin" glow.


Sunday

Pinterest Diy #1

Ahh! Hey guys, and welcome back! Before I get to this weeks Diy I'm announcing this new series. Pinterest Diy, Will it Work or Fail! I know its quite the mouthful of a name because honestly, I'm not creative enough to make it shorter. Anyways I will be trying popular Pinterest Diy's to save you guys the time of trying it out yourself! This week I'm going to be trying to make a strapless dress out of an over sized t-shirt! This pin is under: 29 Ways To Makeover A Boxy Men's T-Shirt
Materials you'll need:
1. An over sized shirt!
How to Do it!
Step 1: Do some crazy folding by following the directions.
The only directions that came with it is this picture.
I guess I'll try it out!

And there you have it! A very easy simple strapless dress made from an over sized shirt! If you were to try this pin, do it with a shirt that has a huge neck hole. Other than that I think it worked pretty well.


A Tropical Centerpiece

Hey! Welcome back to my blog! This week I'll be showing you how to finish off your room with just a small centerpiece. The best part about it is; it's so much cheaper to make than buy! To buy one can range from $20-$40! Who wants to spend that much when they could do the same thing for about $2!

Materials you'll need:


1. Candle Holder or Small Basket
2. A Bag of Small Sea Shells

3.  Water if needed
4. Hot glue gun if needed
5. Wax Block if needed
6. Wick if needed
7. Paper Towel
8. Sand of any type if needed

How to Do it!

Step 1: First step as always is to gather your materials! If you used your candle holder for a candle there may be wax left in it.


The best way I found to clean it out was I took the candle holder to the sink and poured hot water in it; after that sat for a minute or two I dumped out the hot water and immediately put cold water in it. You will find it easy to just pop off all of the wax instead of scraping at it with a pair of scissors.   

Step 2: Now that your candle holder is clean/ your basket, open the shell bag or box and dump out the contents onto a paper towel or then your table will look like this. When I opened the bag shell fragments and dust went all over the table.


 Pick out the shells you would like to use and put the others back in the bag. If you are planning to use sand in your project fill your candle holder with it to about 1/5 full.

Step 3: Take your shells and place them into the sand or into the holder. This is where you can start your customization. Instead of putting your shells into the candle holder you can hot glue them around the outside of your holder and still use it for candles. Or you can use it as a pencil holder! With this the possibilities are endless! If you melt some wax blocks (preferably blue) and pour that into the candle holder filled with shells, you can turn the holder into a candle!

Step 4: You can do whatever you would like. The purpose of this DIY is for you to get creative and give this project your own personal touch. So go ahead and do that!

Saturday

Penny Power!

This week I will show you how to make a battery,  out of pennies! Depending on how many pennies you use the more voltage you will get. The magic behind it is the zinc in pennies dating after 1982; and the vinegar soaked into the cardboard. The zinc in the pennies react to the vinegar and release energy. This energy can then be used to power small electronics like a pocket calculator or in my case, a small led. The best part about it is that it will only cost you pennies!

Materials you'll need:
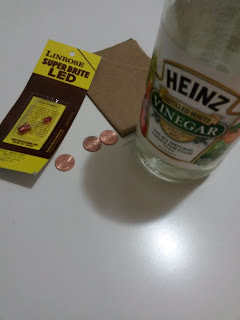
1. Pennies dating after 1982

2. Sandpaper (I used a 60-grit)

3. A bowl
4. Vinegar
5. Cardboard
6. Scissors
7. Item you wish to power
How to Do it!
Step 1: Gather your materials!
Step 2: Put the bowl, vinegar, cardboard, and scissors to the side for now.
Step 3: Use the sandpaper on the "tails" side of the coin, I found this to be the quickest side to sand down. Sand only one side of the penny until it completely exposes the zinc.

Step 4: Repeat step three to as many pennies as you would like. I sanded only three pennies for this project and still got great results.

Step 5: Now put the pennies to the side and bring out the items from step two.
Step 6: Cut out circles that are slightly larger than your pennies. The number of pennies you are using is one more than the amount of cardboard pieces you need. So if I have 3 pennies, I need 2 cardboard pieces.
Step 7: Put the cardboard circles into the bowl and pour enough vinegar onto it so it's covered.
Step 8: After 5 minutes the cardboard should have soaked up a good amount of vinegar. Take the pieces out ans tap dry them.
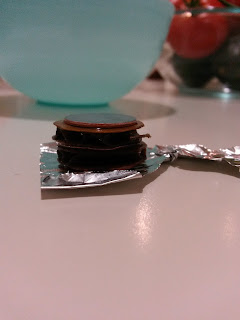
Step 9: Finally it is time for stacking the pennies. On the bottom is a penny with the zinc side facing up, next is a piece of vinegar cardboard, then a penny zinc face up. Continue this pattern until you have no more pennies and there is a coin at the top.

Step 10: Test your battery. You can do all sorts of things! To make sure the energy flows correctly a simple led light can be used. This gives you a visual understanding of the power in pennies. When using wires, put tin foil at the very bottom of the stack so it can flow into the wire easily instead of you holding them together for a while. 

Thursday

Book Folding!

Welcome my friends!
I'm going to teach you how to fold books into art (the easy way)! For this tutorial I'm going to be doing a simple heart design.

For this project you will need:

1. A book (preferably hard cover) with a page count of 200-800
2. A pencil or something to write with
3. A design you want to do

How to do it:

1. Gather your materials for the project!
2. Find a design you want to do.

3. Draw your design on the side of your book opposite of the spine. (For this I'm doing 2 straight lines towards the top of the book, you'll see why. )


4. Fold your pages inwards but not past the line like shown in the picture.
5. Repeat step 4 until all of the design has been folded.