
Hey Guys! Welcome back my lovely friends! <3 I know I didn't post Sunday, I was lazy and was watching the Broncos football game. And now a full week after doing the diy, I decided to write the blog! Other than that, I will give the brief back story to this pin. My hands were disgustingly dry and probably had some dead skin. And for that reason I decided to make a Diy Salt Scrub.
How to Do it!

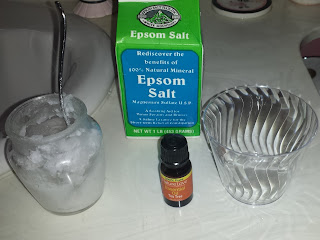
Materials you'll need:
1. Coconut oil and/or regular cooking fat (olive oil) -2/3 Cup
2. Essential oils (100%) - 20 Drops
3. Epsom salt - 1 1/3 Cups
4. Table salt (If needed) - As much as needed
5. A bowl or container you plan to keep it in - 1 Pint

Step 1:Gather your materials! :P
Step 2: Start by adding your dry ingredients being the salt to the container. If you do not have enough Epsom salt (like me), you may add the remainder with table salt.

Now here is where I made one of a thousand other mistakes. You must melt the coconut oil before adding it. Being the stubborn person I am I decided not to thinking it was already soft enough, and I added it to the mixture. Big mistake don't do that!
Step 3: Pour your melted oil in with the the salt and stir the mixture. (I had to do something different though)


Step 4: Drop 20 drops of your 100% pure essential oil and stir that into the salt and oil.


Step 5: And there you have it! An easy to make and use salt scrub! Keep reading if you want to see how I did it...

Same materials, different procedure and measurements.
When I saw how much it was going to make, I was sure that it was too much for me. What I did instead was just eye out the measurements and hoped for the best. Because of this though, everything was just a great fun mess -- BUT it still worked! So without further ado... lets get on with it!

Step 3: Get a couple spoon fulls of solid coconut oil and plop it onto the salt. This is where you are supposed to start wondering how in the world this is supposed to work, and then realize that you did it wrong. Using your handy-dandy brain, one must fill up a sink with hot water and place the cup into it and hope it would melt.

Same materials, different procedure and measurements.
When I saw how much it was going to make, I was sure that it was too much for me. What I did instead was just eye out the measurements and hoped for the best. Because of this though, everything was just a great fun mess -- BUT it still worked! So without further ado... lets get on with it!
How to Do it! (My way)
Step 1: Pour all the Epsom salt you have into a small disposable cup.
Step 2: Notice that it is not nearly enough salt, and slowly pour salt from a soy sauce container (because that is how this household works).

Step 3: Get a couple spoon fulls of solid coconut oil and plop it onto the salt. This is where you are supposed to start wondering how in the world this is supposed to work, and then realize that you did it wrong. Using your handy-dandy brain, one must fill up a sink with hot water and place the cup into it and hope it would melt.
Step 4: Give yourself a pat on the back and still drop 20 drops of essential oils into your mixture because that handy-dandy brain wasn't thinking at that moment. Stir the mixture and you are good to go!
Step 5: Realize that you are not good to go because it is too runny. Keep adding more and more salt until it is too dry. Now add some more olive oil. This time slowly add to and test the scrub.


Step 6: Congratulate yourself on achieving nice smooth hands after using it 20 times while testing!
Step 7: Force everybody in your family to use the scrub because you worked so long on it!
Stay warm, safe, and have a great day! <3
Love you all
-Tessa
Stay warm, safe, and have a great day! <3
Love you all
-Tessa


